

You set a virtual boundary for a robot mower by installing a physical boundary wire around your lawn or by configuring a GPS based virtual fence in the mower’s app, depending on your model. The method you choose affects how the mower navigates and stays within your designated area. Understanding both approaches helps you pick the right one for your yard and avoid common setup mistakes.

Pros
- Wire-free setup saves time and avoids unsightly perimeter wires.
- RTK+Vision navigation works reliably in challenging garden layouts.
- AI obstacle detection enhances safety and protects your mower.
- Multi-zone management lets you customize mowing for different areas.
- Quiet operation suitable for noise-sensitive environments.
Cons
- Limited to lawns up to 1/8 acre, not suitable for larger properties.
- Anti-theft tracking requires an optional 4G module purchase.
- No user reviews yet, so long-term reliability is unproven.
The Segway Navimow i105N is a wire-free robotic lawn mower designed for small to medium lawns up to 1/8 acre. It targets homeowners who want a hassle-free mowing experience without burying perimeter wires. The standout feature is its RTK+Vision navigation system, which combines real-time kinematic positioning with a camera to deliver centimeter-level accuracy even under trees or in narrow passages.
Setting up the Navimow i105N is impressively simple. You guide it with your smartphone to map virtual boundaries, and the AI-assisted mapping feature automatically identifies lawn edges and completes the map. Once running, it mows in systematic patterns to ensure full coverage and changes direction after each pass to minimize tracks. The 140-degree camera and AI algorithms detect over 150 types of obstacles, from toys to pets, providing reliable collision avoidance.
Build quality is solid, with a robust chassis and weather-resistant components. The package includes a charging station, GNSS antenna, and spare blades. The app is intuitive, allowing you to create up to 12 zones, set different schedules, and monitor progress. At 58dB(A), it operates quietly enough for early morning or evening use without disturbing the peace.
However, the 1/8 acre limit may disappoint owners of larger lawns. Additionally, while the 3-year warranty is generous, anti-theft tracking requires an optional 4G module, adding cost. With no user reviews yet, it's hard to gauge long-term durability, but Segway's reputation in robotics offers some confidence.
Overall, the Segway Navimow i105N is an excellent choice for small lawn owners seeking a wire-free, intelligent mowing solution. Its RTK+Vision navigation and AI features make it a standout in its category, though potential buyers should verify their lawn size and consider the optional anti-theft add-on.


Pros
- Comprehensive kit with all necessary accessories included.
- Broad compatibility with many popular robotic mower brands.
- Weather-resistant and durable materials ensure long-term outdoor use.
- Excellent conductivity and tear resistance for stable operation.
- Eco-friendly and safe for pets and children.
Cons
- No reviews yet, so real-world performance is unverified.
- May require additional connectors for very large or complex lawn layouts.
- Some users might prefer a thicker wire for extra durability.
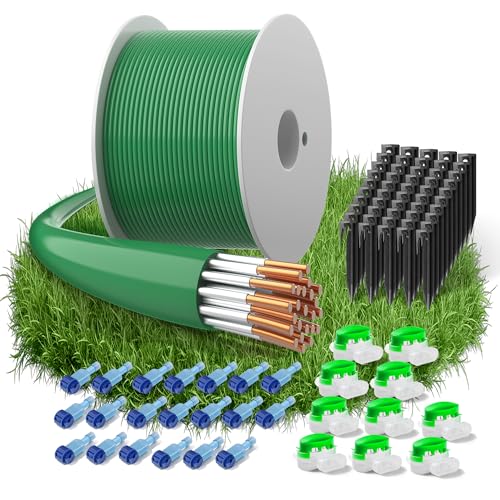
The FOTEEMO 150m/492ft Boundary Cable Kit is a comprehensive accessory set designed to help you install or replace the boundary wire for your robotic lawnmower. It is ideal for homeowners who want a reliable, all-in-one solution to guide their mower and keep their lawn neatly trimmed without constant supervision.
This kit stands out for its wide compatibility, working with major brands like Husqvarna, Worx, Gardena, Bosch Indego, and many others. The 150-meter length is sufficient for most average-sized gardens, and the included 50 ground spikes and 10 cable connectors make installation straightforward. The wire itself uses 24 strands of tinned copper-clad aluminum, which provides excellent conductivity and tear resistance for stable signal transmission.
Build quality is a key focus, with weather-resistant features such as reinforced ground stakes and gel-sealed waterproof connectors. These ensure the kit can withstand rain, sunlight, snow, and ice, offering reliable performance throughout the seasons. The eco-friendly materials also add peace of mind for families with pets and children.
One potential drawback is the lack of customer reviews, so real-world durability is not yet proven. Additionally, while the kit includes 10 connectors, larger or more complex lawns may require additional connectors, which are sold separately. The wire diameter of 2.7mm is standard but some users may prefer a thicker gauge for extra ruggedness.
Overall, the FOTEEMO Boundary Cable Kit offers a well-rounded package at a competitive price point. Its combination of compatibility, weather resistance, and included accessories makes it a practical choice for anyone setting up or maintaining a robotic lawnmower. For most users, this kit will provide the necessary components to get the job done efficiently.

Understanding the Two Types of Virtual Boundaries
Robot mowers use one of two systems to define their working area. The most common is a boundary wire that emits a low voltage signal the mower detects. Newer models use GPS or RTK positioning to create a digital fence without any buried cable.
Each system has its own setup process and limitations. Wire based boundaries require you to lay and secure a cable around the perimeter. GPS boundaries rely on satellite accuracy and may need a clear view of the sky.
Preparing Your Lawn for Boundary Installation
Before you install any boundary, walk your lawn and note every obstacle, slope, and change in terrain. Remove rocks, sticks, and toys that could interfere with the mower or the wire. Mark the exact edge where you want the mower to stop.
Measure the total distance around your lawn to know how much boundary wire you need. For GPS systems, check that your lawn has a strong satellite signal by testing the mower’s connection in several spots. A weak signal can cause boundary drift.
Installing a Boundary Wire Step by Step
Start by laying the wire along the edge of your lawn, keeping it flat against the ground. Use pegs or staples every few feet to hold it in place, especially around corners. Bury the wire about an inch deep if you want to hide it from view.
Create a loop that returns to the charging station, leaving enough slack for the connector. Check the wire for cuts or kinks before powering on the system. A damaged wire can cause the mower to lose its boundary.
Configuring a GPS Virtual Boundary
If your mower uses GPS, open the companion app and select the option to create a new map. Walk the perimeter of your lawn with the mower or a handheld device, following the app’s prompts to mark waypoints. The app will connect these points into a closed boundary.
Set exclusion zones for flower beds, driveways, or other areas you want the mower to avoid. Save the map and upload it to the mower. Some systems let you adjust the boundary later by editing the map in the app.
Testing and Adjusting the Boundary
After setup, run a test cycle and watch the mower approach the boundary. It should turn away before crossing the line. If it crosses or stops too early, adjust the boundary offset or check the wire signal strength.
For wire systems, ensure the wire is not too close to a metal object or a buried power line. For GPS systems, verify that the satellite signal remains strong throughout the lawn. Repeat the test after each adjustment until the mower stays inside reliably.
Common Mistakes When Setting a Virtual Boundary
One frequent error is placing the wire too close to the edge of a steep slope, causing the mower to tip or slide over. Another is forgetting to create a return path for the wire to the charging station, which breaks the loop and disables the boundary.
GPS users often fail to update the mower’s firmware, leading to boundary drift. Skipping the test cycle is another mistake that leaves problems hidden until the mower runs unattended. Always verify the boundary before letting the mower work alone.
How to Fix Common Boundary Issues
- Check the boundary wire for breaks or loose connections if the mower ignores the line.
- Re walk the GPS map if the mower drifts out of the designated area.
- Adjust the boundary offset setting in the app if the mower stops too far from the edge.
- Remove metal objects near the wire that could distort the signal.
- Update the mower’s firmware to fix GPS accuracy bugs.
If these steps don’t solve the problem, you may need a more detailed guide. Our robot mower blog covers advanced troubleshooting and setup tips for different models and yard types.
Frequently Asked Questions
Can I set a virtual boundary without a wire?
Yes, if your robot mower supports GPS or RTK positioning. You create a digital fence in the mower’s app by walking the perimeter with a connected device. This method avoids digging and is easier to adjust later.
How do I adjust the boundary after installation?
For wire systems, you physically move the wire and re peg it. For GPS systems, you edit the map in the app and upload the changes. Always test the mower after any adjustment.
Why does my mower cross the boundary?
The most common reasons are a broken wire, a weak GPS signal, or an incorrect boundary offset setting. Check each of these in order. A damaged wire is the easiest to identify with a signal tester.
How deep should I bury the boundary wire?
Bury the wire about one to two inches deep. This depth protects it from lawn tools and foot traffic while still allowing the signal to reach the mower. Deeper burial may weaken the signal.
Can I use a virtual boundary on a sloped lawn?
Yes, but you may need to adjust the boundary offset to account for the slope. On steep slopes, place the wire further from the edge to prevent the mower from sliding over. GPS systems handle slopes better if the satellite view is unobstructed.
Related Guides
Final Thoughts
Setting a virtual boundary for a robot mower comes down to choosing between a wire or GPS system and following the correct installation steps for your yard. For more detailed guidance on specific models and advanced features, explore our robot mower blog for in depth tutorials.

